The Accidental Sorta-Flipped Classroom

A “flipped classroom” involves having your students do a substantial part of their learning before they get to class (such as by doing readings, watching videos, and the like), then having them engage with that continent in a more applied way when you meet.

My view of this approach has been that it sounded nice, but it was double the work for students, and at least double the work for instructors who somehow had to create what seemed to be a fully asynchronous course that students would do between actual class meetings.

As I write this, I can’t believe I didn’t see this sooner… Duh, me. You’ll see what’s so blindingly obvious in a second…

My online classes are normally fully asynchronous (you’re starting to see the obvious thing, right?) but this term I decided that students could probably use the additional support of a face-to-face (well, video-to-video) meeting. Over the years I’ve found that when my online students have requested a meeting, that meeting involved me telling them exactly the same things I had been via email and written instructions, but somehow their light bulbs went on, and one even hugged me after. I concluded this had more to do with an emotional need to connect than it did a misunderstanding of course content.

These days, coping with COVID means that students are even more stressed-out than usual, so that emotional element is important. Plus, students are being inundated with online coursework, and they have enough trouble keeping the logistics straight normally. I’m not insulting students here. What I’m talking about is akin to the “hit submit” phenomenon where you don’t see the typo in your work until after you hit the submit button. We miss things when we interact with text, even when we think we’re reading it with the utmost care and attention, and students are interacting with a lot of text.

My course meetings happen once a week via video conference, and my original plan was the following agenda: logistical announcements and reminders, open the floor  to questions via the anonymous whiteboard tool, address the questions, then give a brief overview of the content of the upcoming module. Guess when students began leaving the meeting? Right as I started talking about course content. I thought they might want that little preview, but apparently not.

To be honest, I didn’t like doing the preview part. I’d already expended an enormous amount of energy on the online content, including considerable creative energy, so the preview just felt flat to me, and probably to them as well. Partway through I got sufficiently bored with that part of the meeting that I gave up on it and just pulled out a weird rock that I found in my yard the previous weekend. I realized that my initial assumptions about what was going on with that rock were actually wrong, but in a “teachable moment” kind of way. Lucky for me, students had just covered the content relevant to understanding that particular teachable moment. (You see it now, right?)

I wove together a detective story of sorts, explaining what I originally thought was going on with the rock, and then what was wrong with that idea. I even managed to bring Bowen’s reaction series into the conversation. I showed them a few other rocks that helped me realize what the heck was going on with the weird one. I explained how I started from being wrong, and reasoned through to a better answer, asking myself questions along the way. I made a point of tying in key concepts as I went so they could see exactly how the things they were learning fit together. I enjoyed this far more than the boring preview, and it sounded like they did as well. I decided that “weird rock” story time would replace the preview for the remainder of the term.

At some point through the weeks that I was making this change, I actually engaged in a conversation about flipped classrooms, and thought to myself, “That seems like way too much work for questionable benefit.”

But what I was doing was actually a version of this pedagogical approach. There was an extraordinary amount of work involved to get to the point where I could do it, but that work was to build an asynchronous online course, not because I had this in mind all along. For students, this doesn’t actually involve the extra work I envisioned. They attend the meeting because they get information that will make the course an easier experience for them (attendance isn’t mandatory, so it’s their choice to be there), and the “flipped” part is just story time. There is no assessment tied to this, and there doesn’t need to be, because they already do short quizzes for each course module. 

I fell into this completely by accident because it just worked better than what I was doing, not because I felt the need to attempt a particular pedagogical approach. And I think that might be significant—while it’s great to experiment and try new things, we shouldn’t be attempting a pedagogical approach just because someone tells us it’s the latest thing to try. I mean, you could, and maybe it’ll turn out well, but that will only happen if it’s a good fit for what you need to accomplish in your course, and realistic in terms of your resources. If your inventory of resources has just one item in it—you—then it’s extra important to make sure there is enough you-budget to go around.

Monday Night at the Museum

When I was hired in 2012 to teach geology at St. Peter’s College in Muenster, Saskatchewan, I inherited their rock, mineral, and fossil collection. It consisted of several cardboard boxes filled with samples in Ziploc bags, most of which had labels.

I’ve never learned the identity of the mystery someone who assembled the collection. This is a shame, because it’s a remarkable collection and I have so many questions. Either the collector had a lot of geologist friends who hit myriad classic locales (there’s aragonite from Molina de Aragon, for goodness’ sake), or they were themselves extremely well travelled. I envision a sort of geological Indiana Jones, but ideally without the colonialism. Most likely Geo Indy was one of the monks at St. Peter’s Abbey.


I can hear the typewriter, see the yellow glow of a 1950s-era desk lamp that will still be in use 40 years later, and feel the neck strain.


My respect for Geo Indy only grew after finding a crystal of fluor-buergerite, a tourmaline-group mineral that was, for a time, known only from a single location in Mexico.  

After rummaging through samples for several weeks, I also discovered five different uranium minerals, cinnabar (yay, mercury!), and realgar (for your daily dose of arsenic). I started to pay special attention to where I set my coffee, and how thoroughly I washed my hands after playing in the minerals. I learned to expect the (very random) unexpected.


Oh. Wow. Huh. That’s…um…something.


Some of the minerals needed extra attention because they were fragile, and occasionally I had to prevent a hygroscopic mineral from happily slurping up atmospheric moisture and getting all powdery.

Slowly—very slowly—order emerged amongst the minerals. I looked up each to find its chemical formula and its Nickel-Strunz classification. I checked the name on the label against online images to verify that the label was correct. Some of the minerals have been renamed since they were first collected, or subsequently recognized as a mineral group rather than a single mineral, so I sorted out the synonyms and official names as well. (Based on this the collection is 1960s-ish at youngest. The oldest item with a date on its label was collected in 1868.) I made new colour-coded labels, and placed each sample in a plastic tray or a jar, depending on how much protecting it needed from the environment, and how much the environment needed protecting from it.


I wonder what Geo Indy would have thought of this.


Those specimens without labels, or with the wrong labels, had to be identified. Sometimes that was easy, but in other cases not so much. It took me several years and some close-up photography to finally decide that the bright green crust on an unidentified sample was the mineral of interest, not lichen, and then to connect it to an orphaned label for the uranium-bearing mineral andersonite. Fortunately, I hadn’t employed a taste test for purposes of mineral identification. (This a test we teach undergrad students—a for-real test, not a hazing-type “test.”)

Then in 2016, a student needed a place to store his rock collection to prevent it from being a victim of downsizing during a move. He was set up at the College with a room, table, and chair, and spent the remainder of the term diligently organizing his collection and identifying the rocks and minerals within it. Up to this point, the St. Peter’s collection didn’t have an official home, so this—finally—was my opportunity to do something more with it than cover every horizontal surface in my home office. I did not return the key for that room at the end of the term.

Now that I had a space, I began the long process of moving the collection in and displaying it in a way that would be beneficial to students. The first thing to do was get some shelves and display cases. The monks of St. Peter’s Abbey have decades worth of furniture stashed away, and they took me “shopping.”

I started with a plopping-things-on-shelves approach just to have items to look at should someone wander by, but my ultimate goal was to select particularly interesting specimens to display, and then provide just the right amount of information for visitors to understand why the specimens were interesting. The invertebrate fossil collection was the easiest place to start.

I made good use of my new USB microscope…

…a tube of kitchen and bath silicone, and some dollar-store picture frames.

After securing professional development funds from the St. Peter’s College Faculty Association, I upgraded to fancy plastic displays from Staples, and suspending samples from wires anchored by beads and E6000 glue. (That glue is amazing stuff.)

Some of my efforts required prolonged negotiations with gravity.

The displays I’ve built thus far only scratch the surface of what can be done to manage and show the collection, not to mention the things you can do with tools like augmented reality software. Ever wonder how the geological timescale maps onto a 24-hour clock?

Someone could be kept busy indefinitely, but it’s time to pass that task on to someone else. This is unpaid time-consuming work outside of the teaching I’m hired to do on short-term contracts, and I need to start allocating that time in a more sustainable way. There are no funds from the College for this task, so out-of-pocket costs are an issue. There’s also the matter of whether or not I get hired to teach again.

If the College were to support this project officially, whoever takes it on will need to change how it’s hosted. At the moment it’s squirreled away in a small out-of-the-way room, and not really on anyone’s radar. Moreover, the displays aren’t secured, so the space can’t be opened to students or the public except when someone is around to supervise. In the past, I was that someone for the duration of my office hours on Monday evenings.

The simplest way to make the collection available for viewing would be to hang lit locking glass-fronted cabinets on the wall in a frequently travelled area. Ideally, someone who likes to play in rocks and fossils and make pretty pictures would be hired to put it all together.


This is pretty much ready for a glass case. Just saying.


Should You Use That EdTech?


When deciding whether to use a particular educational technology, consider whether the educational benefits are justified by the effort required to make it work.


The peer-review tool in the Blackboard learning management system should be buried in cursed soil, have hexes placed upon it, and never be spoken of again. I came to this conclusion within the first few weeks of a new online course offering.

Peer review—when students evaluate each other’s work—has been an effective way for students to check whether they’re on the right track mid-way through their course projects. In and of itself, peer review is a great idea. My students like it and find it helpful. The problem is in the execution.

This was all my own fault, really. Normally I approach these things with a large dose of skepticism regarding how well the student-tool interaction will go, and have multiple back-up plans. I don’t know what happened this time—my money’s on possession by a diabolical entity—but I decided to trust that everything would go smoothly. Dear friends, it did not.

First, the tool won’t accept late work. Someone is always late, whether due to leaving assignments to the last minute, or not understanding the process, or both. In this case there were several someones.

Second, students didn’t know how to access the tool. If they read the instructions and followed them exactly (not a safe assumption for a variety of reasons including some perfectly legitimate ones) they might have understood that the link saying “View/Complete Assessment” was what they needed to click on to submit their work for review.

Third, they made errors in the submission process. There was a how-to video, but in my experience those are ineffective for at least 10% of students. In this case it was worse thanks to a confusing and difficult-to-navigate user interface within the peer-review tool.

In the end I had to come up with workarounds to ensure everyone had a chance to give and receive feedback, and now I just use a streamlined version of those workarounds instead of the tool itself.

This experience, and my folly in trusting that other Blackboard tools would also function as advertised in that same course, have led me to outline some general rules surrounding whether you should use a particular learning technology or not:

  • First and foremost, if you’re working with an edtech fiend and see a manic gleam in their eyes as they enthuse about a new learning tool, you need to back away.
  • If your idealistic inner teacherperson is considering the use of a new tool and casually dismissing the amount of work it will take, this is a bad sign.
  • If students must get every step exactly right to make the thing work, proceed as with the first bullet point.   

As a handy reference, print out the diagram at the beginning of this post and display it wherever you usually contemplate the pedagogical decisions you ultimately regret.

Due Dates: Who Needs Them?

Periodically pedagogy Twitter veers in the direction of reasons students miss due dates, and inevitably ends up with someone suggesting that we should abolish due dates altogether. The pro-abolition side argues that students have complex schedules and many responsibilities to juggle, and that due dates are an unnecessary and outdated hoop for them to jump through. The anti-abolition side argues that due dates matter in the “real world,” and it behooves students to learn time management skills.

I come at this discussion having taught courses where the only due date was the course end-date. If you’re thinking of abolishing due dates, there are a few things you should consider.

Going Due-Date Commando

"Dinkum_Boy"_calendar_1919_(14839804822)

An image of a calendar received by New Zealand’s Patent Copyright office that combines the remarkable properties of alluding to due dates, hinting at going commando, and bearing a Creative Commons license. This has been a good internet day. Source: Archives New Zealand (2008) CC BY-SA 2.0. View source.

First, here is my (admittedly anecdotal, and potentially foggy memory of) experience with the no due-date arrangement:

  • Students who started their work early tended to submit their work consistently, and had it done with time to prepare for the final exam.
  • Roughly 50% of students paid a fee to extend their course end-date by 2 months. Of these, the majority did not start early, and a good chunk had not submitted any assignments prior to their original end date.
  • It was common for students who paid for one extension to pay for a second extension.
  • A non-trivial number of students did not complete the course work before they had to write the final exam. After failing the final exam, they paid a fee for a second attempt at the exam, and used the intervening time to complete course work, for which they still got credit.

Students were given a recommended schedule at the start of the course, but I can’t help but think that the absence of official due dates gave the impression that students could succeed without working on the course regularly. An absence of due dates early in the course most certainly contributed to students starting the course late, and thus the negative outcomes mentioned above.

Pedagogical Arguments Against Going Commando*

*for due dates

Here are the reasons I have due dates, and why I think it would be a mistake to run my courses without them. If none of these apply to you, then maybe you don’t need due dates after all. If they do apply, then perhaps consider the consequences of abolishing due dates in that context.

Reason 1. My Workload

I use due dates to distribute my grading evenly through the term, and make sure I have time to give students meaningful feedback. If students can hand in their work whenever it suits them, it will suit many of them to prioritize other course work with due dates over coursework without. It’s reasonable to expect a glut of grading at the end of the term, and that means marathon grading sessions for which I am entirely too old at this point.

Reason 2. Students Have Time to Use Feedback

In the courses where students handed in their work at the last minute, there was very little time before the final exam to review the feedback I gave them. Who knows if they even had the mental wherewithal to process it, after focusing on the work so intently for so long? There are more useful things I can do than write detailed comments that no-one will ever read. Not that I’m guaranteed they’ll be read on assignments with due dates, but I’d lay better odds on it.

Reason 3. Academic Integrity

The more work students have to do in a short period of time, the more stress is involved, and the greater the likelihood that they cut corners. There were a number of reasons why I quit the no-due-dates teaching job, but a big one was that the courses were rendered pointless by cheating. The assignments submitted at the last minute were not infrequently copied from graded work that other students had submitted earlier.

Now imagine a desperate email from a student that you just reported for submitting someone else’s work, wherein the student pleads for leniency because they need the course to graduate, and their parents are already on a flight from overseas to see them get their degree. (In case you’re wondering, that student had an awkward conversation with their parents.)

Reason 4. Course Organization

The assignments in my courses are meant to reinforce particular concepts and skills. The assignments are most meaningful when I’ve just finished covering the relevant topics. The assignments are meant to sort out issues students had with those topics, and prepare them for the next thing on the list. Those kinds of assignments would have little value if students did not do them at the right time and in the right order.

In addition to impacting the relevance of assignments, no due dates would mean having to answer the same questions about assignments over and over again, because individual students would be focusing on them at different times. And as per Reason 3, I’d either have to not grade the work at all, wait until all assignments were submitted to grade the work, or just accept that some students won’t do their own work, and either disregard academic misconduct (not gonna happen) or spend time writing academic misconduct reports.

Getting that Breezy Feeling of Flexibility without Actually Going Commando*

*for due dates

If any of those reasons resonate with you, but you still feel the need to build in some flexibility, I’ve seen that done in a few ways, and have some of my own.

1. By the Book

In the syllabus, set out the scenarios under which a student will be permitted an extension. Be specific about whether you require an explanation, or some evidence that they need an extension. Be careful here about asking for personal information or making evidence burdensome. If you really want to help a student out, you don’t want them to not ask for an extension for fear of having to explain their mental health issue to you, or describe embarrassing or traumatic life circumstances.

Here is where we venture into another sore spot for pedagogy Twitter (the last time this conversation happened, people were bashing each other for a full week), the Great Asking for Granny’s Obituary Debate. On the one side were those tired of being lied to about grannies (metaphorically or otherwise) having become deceased as due dates approached. On the other were those whose metaphorical (or literal) grannies had died, and were furious and hurt about being treated as liars at one of the worst times of their lives.

My own approach to this is making a decision in the student’s favour unless I have specific evidence suggesting otherwise. My trust battery runs a little low most days, so this is the best way to sidestep the issue of honesty entirely. Aside from which, I prefer policies that work consistently, and a gut check isn’t one of those.

2. The Oprah Method*

*YOU get and extension! And YOU get an extension! EVERYONE gets an extension!

Some simply permit extensions to students who ask, whenever they ask, with no explanations required. But either you tell all students you’ll do that, or you risk the benefit only being used by students who feel confident questioning  due dates. The students who need the extension the most might never think to ask for it. Of course if you make that policy widely known, you have to be prepared for your grading schedule to go sideways, and depending on the size of your course, a snowstorm of extension requests.

3. Get Out of Jail Free Card

You could give all students a one-time due-date extension they can use at their discretion. If you do that, make sure you have a reasonable way to determine what is an appropriate length of extension.

4. Extension Account

A late penalty need not be a bad thing. If you want to emphasize the importance of sticking to due dates, but you also want some flexibility, a small late penalty (between 1% to 5% per day up to some maximum) that students could choose to take is one way to go.

You could combine this with the Get Out of Jail Free Card, or the By The Book method, or just give all students an “extension account” of so many points to go against deductions for lateness. This allows students to be in control of how they “spend” the time they have. I use something similar to account for points lost to technical difficulties when students are graded on participation in in-class response system questions.

So In Conclusion…

Before you abolish due dates, think about why you have due dates to begin with. You might be doing your students a favour by getting rid of them, but then again you might not. In my experience, the latter has been the case. To my mind, the better choice involves a consistent application of reasonable flexibility and accountability.

Humans vs Nature: An Experiment with Open Pedagogy

I’m still working on the third edition of our physical geology open textbook (I really should be done by now, but you know how these things go), and thought it would be a nice touch to include vignettes about how geological events have affected people.

Not lists of damage to property and infrastructure, or the costs incurred, or the number of fatalities. I was thinking about descriptions in the words of people who were there. What did they see or hear or smell? What did the air taste like? What did they think about as they watched the event unfold? What was it like to be there?

I wanted students to have a connection with those events that went beyond knowing a list of facts. Why? As Maya Angelou put it, “I’ve learned that people will forget what you said, people will forget what you did, but people will never forget how you made them feel.”

Making vignettes for an open textbook was an opportunity to expose students to the idea of “open.” I told them that many people have generously shared their work online, often permitting it to be adapted and remixed in addition to allowing others to re-use and redistribute it free of charge. I told them about Creative Commons licenses, and Public Domain, and made it a project requirement that they use only open-access materials.

The vignettes themselves took the form of posters. I provided detailed criteria, but key points were that students must use language accessible to another student who has never taken a geology course before, and that posters should be 1 part science and 2 parts lived experience. Less important, but really cool, the poster also had to include an augmented reality component via HP Reveal. Here’s the sample I gave them.

poster_small_view

Sample poster (by me) with a first-hand account of the eruption of Mt. Pelee in 1902. Eye-witness account courtesy of the Digital History Project. Get the poster as a PDF file.

To see the augmented-reality element of the poster—a pop-up video montage of images from the eruption—download the HP Reveal app for your smartphone or tablet, and follow my account (username karlapanchuk). Then view the poster through the app. Or, click here to see the video.

UPDATE: Sadly, HP Reveal is no longer available.

I had a few questions going into the project:

Will the posters be appropriate for the textbook? There’s the matter of accuracy, but in an open textbook accuracy isn’t enough. Materials must also have the right license.

In the limited time available, is it possible to teach students enough about open access and Creative Commons to have them make the right choices about which materials to use, and how to use those materials?

Can I be reasonably certain that students understand what it means to release their own work under a Creative Commons license, and that they have a choice about whether and how to do that?


Norma Talmadge, photographed in 1922. Norma doesn’t have answers either. Photographer unknown. View source.


Mostly, I still have those questions, but here are some things I learned:

Thing 1. A 20-minute lecture is not the best way to give students a working knowledge of open-access resources, and how to find and use them.

Thing 2. I’m not confident about how to balance teaching about open access with teaching geology. Should I minimize the time I spend Creative-Commons-proselytizing and restrict students to sources where I know materials have appropriate licenses? That seems like a missed opportunity, though.

Thing 3. An entirely realistic outcome is that a student will add “Public Domain” to all figure captions regardless of whether the images are in the public domain or not. I need a way to make students accountable for their choices that isn’t me spending days tracking down the copyright status of every image students use. Perhaps this is a job for peer review.

Thing 4. Some classroom experiments generate a roomful of quizzical eyebrow gymnastics that translate roughly as “I thought this class was about rocks.”

Historical Geology Timeline Activity

Some time ago I dreamed about the perfect tool for teaching historical geology. It would be an interactive timeline that students could update with events, and it would even have the ability to allow students to quiz themselves.

While that tool has yet to materialize, I did come up with a low-tech solution that permits the plotting of geological events that occur over widely varying timescales. I created four timeline forms to fit 8.5” x 11” paper. The forms cover different intervals and scales of geological time. They are:

  • Timeline 1: The Precambrian (4.5 billion years to 0.5 billion years ago
  • Timeline 2: The Paleozoic Era (540 million years to 250 million years ago)
  • Timeline 3: The Mesozoic and Cenozoic Eras (250 million years ago to present)
  • Timeline 4: The Cenozoic Era (last 10 million years of the Cenozoic Era)

The forms have divisions of the geological timescale along the bottom, and a numerical timescale across the top.

Timescale_forms

Click here to download timeline forms.

So here you go, but you should probably know…

Plotting geological events on the forms can be tricky. Some events have well-known dates, but some don’t. Events may occur in a geological instant, or take hundreds of millions of years. I provided a sample timeline to give students an idea of what to do in different cases, and how to express uncertainty.

Sample_timeline

An example of how to plot events

Even with those considerations handled, the students who used this exercise were looking up dates for themselves, and that added another layer of complexity. I prepared a handout to guide them through some additional challenges.

Challenge 1: Different sources or different pages in the textbook give more than one date for an event.

Expect that this will happen. Sometimes a source will be general (akin to saying World War 2 happened in the twentieth century), and sometimes it will have more specific information (it began in 1939). Ideally, the interval on the timeline should reflect the most specific information available (i.e., the most specific date or the narrowest range of dates). This makes it much easier to see how the timing of one event compares to the timing of another. We could plot the appearance of both the Ford Model A and the Ford Mustang as single bars covering the twentieth century. But if someone who had never seen or heard of an automobile before looked at our timeline, they would lack the context to understand that some evolution had taken place.

Keep in mind that geologists themselves may not know the exact dates of a particular event. The boundaries of the timescale can also shift if new information comes to light, so an older source might put the same event at a slightly different time than a new one.

In the end, students shouldn’t get hung up on finding exact dates (because mostly they won’t be able to), but they should be trying to get the dates in the right ballpark, and trying to make that ballpark as small as possible.

Challenge 2: The textbook or other source mentions a geological time interval that isn’t at the bottom of the form.

The forms have increments of the geologic timescale (eras, periods, and epochs in some cases) at the bottom, but these intervals are in fact subdivided into smaller ones. For example, the Devonian period is divided into Early, Middle, and Late epochs. The Late Devonian is divided into the Frasnian and Famennian ages. To figure out where a division belongs, consult the Geological Society of America’s Geologic Time Scale.

Challenge 3: The source says an event happened in the “upper” or “lower” of some interval.

When talking about the timescale, periods are sometimes divided into Early, Middle, and Late. These are official designations for the timescale. In contrast, when talking about the rocks themselves, a layer may be referred to as “Upper Devonian.” “Upper” and “Lower” refer to the position of a bed in a stack of rock layers. Older beds are lower down, and younger beds are higher up. While careful decisions have been made about the ways in which uppers and lowers fit into the timescale, a rough approximation for this exercise would be to treat “Upper” the same  as “Late,” and “Lower” the same way as “Early.” A less-rough approximation would be to look up the ages of the units in question.


Ways to use the timelines

My students used the timelines to plot events listed in assignments. Some students printed the sheets and wrote directly on them. Some students added to the timelines using drawing software, or using the mark-up tools within Adobe Acrobat. But if you wanted to go all out, you could print the forms out in mega-huge format, post them on the classroom wall, and stick on images or text to mark events.

Or you could turn them into PowerPoint backgrounds and have students build presentations on top of them.

Or you could make them SUPER-mega-huge in drawing software, decorate them all up with whats and whens, then print a poster.

Whatever you do, send pictures!

Student-Curated Video Collection: An Activity

AEG/Telefunken television from 1937. This was newfangled back when I started screening videos for this course. Eckhard Etzold, CC BY-SA 2.0

AEG/Telefunken television from 1937. This was newfangled back when I started screening videos for this course. Eckhard Etzold, CC BY-SA 2.0

I’ve been working on revisions to a distance-education physical geology course, and attempting to make it more interactive by offering videos. Have you ever tried to source relevant and accurate videos for multiple topics across multiple course modules? It involves going through hours and hours of videos, and rarely finding one that is directly on point or without problematic inaccuracies. My search technique has evolved to skipping anything longer than 5 minutes that doesn’t come with a transcript or clear description, and then screening the video at 1.5x speed.

So what to do about getting reliable videos without spending most of your adult life in the attempt… well, one school of thought would say let the students do it. I experimented with this kind of activity a few years back, but didn’t have an opportunity to deploy it full-scale. Here are the instructions I provided, with annotations. If you try it, let me know how it goes!

Curating Videos for Historical Geology

In this assignment you will assemble a collection of videos and complementary resources for historical geology students. You will work from the TED Ed* Lessons Worth Sharing video collection, Awesome Nature. This collection can be found at http://ed.ted.com/series/awesome-nature.

*I chose TED Ed because the videos are short. The student who did this moved on to TED Talks, which are  longer. I’d advise limiting the length of videos if you don’t want to spend hours watching videos in order to grade the results. If I were doing this today, I’d also recommend the fabulous video collection at MinuteEarth.

Your work will form the basis of a collection of resources to be made available to future students in Geology 109. If you wish, you will be acknowledged as the curator of the resources when they are posted, although I reserve the right to make any modifications that might be necessary to optimize the effectiveness of the collection.

Rationale

In the Independent Studies version of Geology 109, students do not have access to video lectures. Sometimes the textbook is unclear or written in too technical a fashion for students new to the topic to immediately understand what is being said. Videos designed by someone with a different perspective on the topic can be very helpful for reinforcing concepts, or clarifying points of confusion.

The problem is that not all videos are created equal. Some have factual errors, or even seek to mislead viewers. Some could benefit from clarifications. The task of looking for and vetting videos requires an understanding of the objectives a video should satisfy, and an assessment of how well the video accomplishes those goals. It also requires that viewers understand why they are watching the video and what they should get out of it. When an instructor looks for videos, he or she has an idea of what students find difficult, but it is really the students themselves who can most accurately identify where they need help, and what helps the most.

Your task

  1. Identify a video that satisfies one or more of the learning objectives for Geology 109. Provide the name of the video, and the link.
  2. Write an overview of the video. This should not simply restate the title of the video, but should summarize its contents in three or four sentences.
  3. List the learning objectives from the Geology 109 Course Guide that the video covers, and indicate which chapter they are from.
  4. Identify three key questions that the video answers. The questions should not be a restatement of the learning objectives, and should make it clear to other students why they would find the video useful. The questions will take the following form:
    1. Have you ever wondered …?
    2. Would you like to know how [something works or happens/ happened]?
    3. Have you ever been confused by …?
  5. Identify five terms that are technical in nature, and that are key to understanding the topic of the video. Define those terms in simple language, using your own words.
  6. Identify three “loose ends,” and explain the loose ends so that others watching the video will not be confused by them. The “loose ends” could be:
    1. Points that could be expanded upon
    2. Points that might leave some confusion in the minds of students watching the video
    3. Factual errors (hopefully there won’t be any of those)
    4. Points that are inconsistent with something in the course materials (e.g., competing hypotheses, more recent information, etc.)
  7. Write ten multiple choice questions so students can test their knowledge after watching the video. Supply the correct answers. The questions should cover key points. A good set of multiple choice questions will have the following characteristics:
    1. Four answer options (a through d)
    2. Little to no use of answer options like “all of the above” or “none of the above.”
    3. It should not be obvious to someone with no prior knowledge of the topic which is the correct answer. (Over-simplified questions are not helpful when trying to understand a topic.)
    4. Questions should be relevant to the topic of the video and to the learning objectives.
    5. After doing the questions, it should be clear to students what key points they have not understood.

Deliverables

You will write up each video following the layout supplied at the end of this document. This layout is designed to be compatible with the Blackboard system. The specific software you use to create the write-up is not important, nor is the font. (Blackboard has some formatting limitations, and formatting must be done within the Blackboard text editor, so this is something I will have to do afterward.)

Grading

Each write-up is worth up to 10 points. Those points will be calculated as follows:

  • Is the video relevant to Geology 109, and is the relevance clearly explained? (2.5 points)
  • Are all of the elements in points 1 through 7 above provided (e.g., the learning objectives, multiple choice questions, etc., are present)? (2.5 points)
  • Is the write-up scientifically accurate (e.g., definitions are correct, multiple choice answers are correct, etc.)? (5 points)

You may curate as many videos as you like*, however the maximum possible score for the assignment portion of the class will be 100%.

*This assignment was designed for a specific student. You may wish to rethink the “as many as you like” policy, or turn it into a group project to reduce the workload.

Format for submission

Square brackets mean text that you will insert. Text in italics are my notes, and don’t need to be included in your write-up.

[Video title]

[url]


Summary

[Three to four sentence summary of the video topic]


Why watch this video?

  • Have you ever wondered […]?
  • Would you like to know how [something works or happens/ happened]?
  • Have you ever been confused by […]?


This video addresses the following learning objectives for Geology 109:

  • [Learning objective], Chapter [chapter number]
  • [Learning objective], Chapter [chapter number]
  • [as many additional points as necessary]


Some key terms used in this video are:

[term 1]: [definition]

[term 2]: [definition]

[term 3]: [definition]

[term 4]: [definition]

[term 5]: [definition]


Special notes

  • [Loose end 1, explanation]
  • [Loose end 2, explanation]
  • [Loose end 3, explanation]


Note: these could take the form of, “In the video, [topic] is mentioned, but [concept] isn’t explained. Here is what it means,” or “The video says [this] about [topic], but in the textbook it says [that].   The difference is [reason].”


Self-test

[Questions 1 through 10]


[Solutions (e.g., 1a, 2b, 3d, …)]


Deadline

All write-ups must be submitted on or before Monday, March 30th 2015.


The Case for Being a Nitpicky Grader

axis

I’ve always had a sense of the educator I didn’t want to be. To this day I remember the prof who became annoyed with endless questions and finally huffed, “My five-year-old could get this!” Student me, though stumped, decided to try work it out on my own. If I couldn’t get it, it was a relatively small thing on which to take a hit when it came time for exams.

These days when I come across a topic that seems ridiculously simple, but students aren’t getting it, I try to get their input on what the topic looks like to someone new to the subject. I use that input to come up with a more effective strategy to tackle it. I’m not that prof.

I used to not be the nitpicky-grader prof either. You know the one- they took points off for the tiniest infraction, and you could never get it exactly right. I’ve had a change of heart on that one, though.

When a student made a small error on an assignment, I used to point out the error and explain the problem, but not take off points. It’s a minor error, right? They’ll do better next time. But regardless of how carefully I explained, the same errors would show up in the student’s work over and over again. Then I started taking off a half point for those kinds of errors. Guess what? Suddenly students decided those small details mattered.

I was somewhat taken aback that the only way to convince them to do it right was making it costly to do it wrong. Suddenly the student who was a chronic non-labeller of graph axes is producing clear labels with proper units. The student not bothering to spell technical terms correctly (I mean, c’mon you have spellcheck for your homework for dog’s sake!) suddenly learns the spelling. Importantly, those errors also disappear from exams.

The distinction between formative and summative assessment is that formative assessment is meant to be low stakes/ no stakes, and help students analyze their work to improve. Summative assessment is the higher stakes measurement of whether they’ve met course objectives or not. Formative assessment involves helpful hints, and summative assessment involves correct or incorrect.

But as it turns out, unless there is something at stake to distinguish “important” from “whatever,” formative assessment is “I’ll take it under advisement” assessment, and summative assessment is “it seems you neglected to do so when the stakes were much higher” assessment.

I wasn’t doing any favours by letting things slide in the hope students got the message, so now I’m that prof.

The Mission (Geo)Impossible Scavenger Hunt

It was a Saturday morning like any other and my husband and I were enjoying a cup of coffee while he channel surfed to find a program related to disassembling and reassembling automobiles. He paused on a channel showing the movie Smokey and the Bandit, a classic film from 1977 about an epic beer run between Atlanta and Texarkana. “I wonder if I drove that road,” he said.

So we looked at Google Earth and found that there were two possible highways that Smokey and the Bandit could have used to move their beer. And then I saw it: the intervening space had a variety of superposed plunging folds. The seed for Mission (Geo)Impossible was planted the moment I began to wonder how I might lead students on a path to make that discovery for themselves. I don’t recall whether it was I or my husband who came up with the actual notion of torturing challenging students with a scavenger hunt for information, but it certainly appealed to my nefarious side.

What is it, exactly?

Download the handout here.

Mission (Geo)Impossible is a series of 19 quests that teams of students complete for extra credit. Why 19? I like prime numbers. 17 seemed to few, and 23 was too many. The first time around the optimal number of quests was one of many unconstrained variables. Why extra credit? Because when I make up the quests I honestly have no idea whether students will be able to do them. They are meant to be challenging problems, and are of a type that I’ve never seen as part of an assessment or activity. Students go into this knowing it will be difficult (I make sure they know), and do so by their own choice so I can feel a little less guilty about how hard they work.

Why on Earth would students want to do this?

The enticement for them to try Mission (Geo)Impossible is a substantial bonus on their final grade. If their team completes all 19 quests, 2.5% is added to their grade. That means a 60% becomes a 62.5%. If their team finishes first, they get another 2.5% for a total of 5%.

That might seem like a lot, and I wrestled with whether this was appropriate or not, but in the end I decided it was legitimate for three reasons. First, it is a term-long project and they work very hard on it. Second, to complete it they must learn a lot of geology and do synthesis tasks at a level that I would never ask of students in an introductory physical geology class under other circumstances. Finally, I’ve applied similar curves to final grades, and with serious misgivings. To my mind, this extra credit work is a heck of a lot more legitimate than bumping grades so the class average falls in the magical 60% to 65% range.

I also try to entice them by imbuing the whole undertaking with a spirit of playful competition. Students are competing with me- I tell them I designed the quests to mess with them (true), and challenge them to beat me. They are also competing with their classmates. There is a bit of secret agent role-playing, too. It is Mission (Geo)Impossible, after all. They “activate” their teams by emailing a team name and roster to Mission (Geo)Impossible Command Central, and there is a Quest Master who confirms their activation.
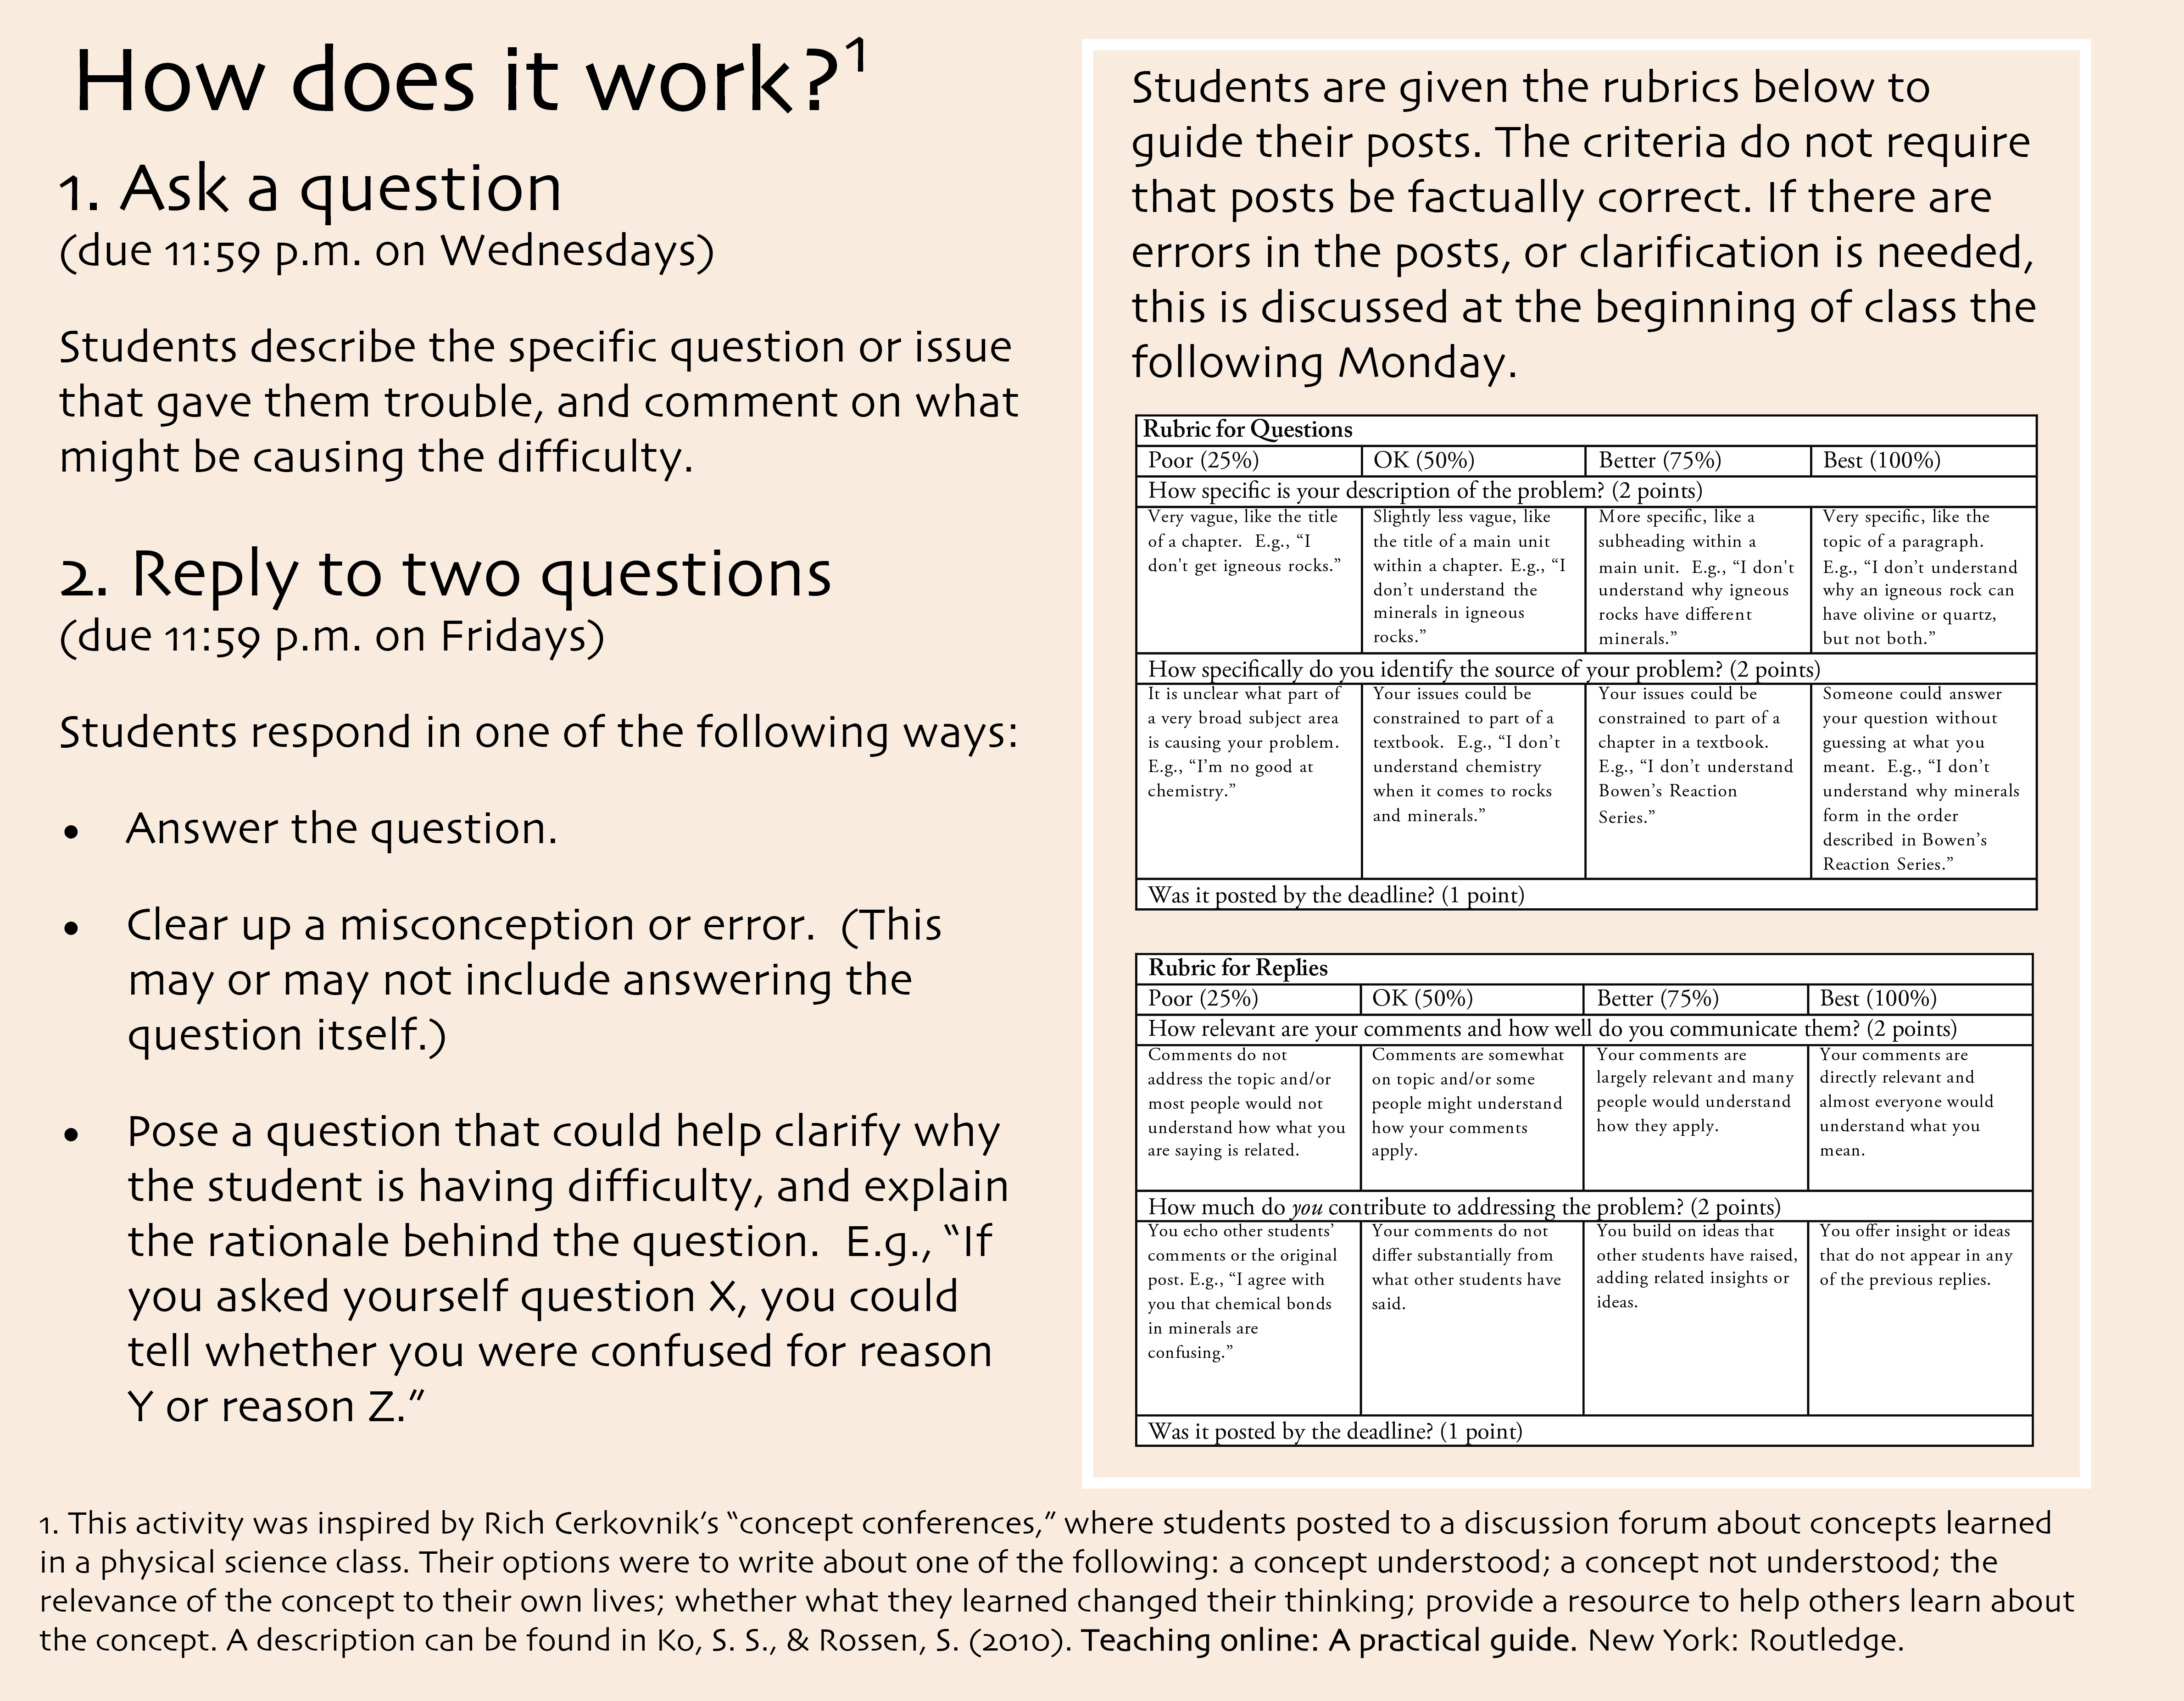
How does it work?

The mechanics of the scavenger hunt are designed to keep the level of work manageable for me, to keep my interactions with teams as fair as possible, and also to leave students to their own devices. Those devices turn out to be very good, and likely better than students realize themselves, which is a big reason why I like this activity.

To begin with, I post a pdf containing 19 quests on the course website. The procedure they follow is to email their quest solutions to Mission (Geo)Impossible Command Central, and the Quest Master responds with one of three words: “correct,” “incorrect,” or “proceed.” “Proceed” means some part of their answer is correct, or they are going in the right direction, but I don’t provide any information about what they’re doing right. That keeps me from having to worry about whether I’ve given one team more of a clue than another.

They can submit as many solutions as they like, and they have taken advantage of this in interesting ways. One team submitted “anagram” as their first attempt on a quest. They were trying to figure out what sort of puzzle they were solving. If they had gotten a “proceed” they’d know it was an anagram. The puzzle turned out to be a substitution cipher rather than an anagram, but it was a clever approach nonetheless.

So what do these puzzles look like?

The quests specify a target (a general thing to aim at), and deliverables (what students must submit). Then they give the clue.

Here’s an example of one quest that they solved relatively easily:

Lisbon

Solution: Earthquake, Lisbon, Portugal

The key to this quest is realizing that the minerals can be assigned a number using the Mohs hardness scale. In the order the minerals appear, those numbers are 1, 7, 5, and 5… or 1755, a year. Students could google “events in 1755,” they might actually know what happened, or they might have read the syllabus and found the sidebar I included about the earthquake in Lisbon, Portugal, that happened on 1 November, 1755.

Here is another one. It proved a bit more challenging for some students.

dancing men

Solution: Paricutin. It’s a cinder cone while the others are stratovolcanoes.

If you’re a fan of Sherlock Holmes, you’ll recognize this as the cipher from The Adventure of the Dancing Men. Solving the cipher gives the following rows of letters:

PINATUBORA

INIERFUJIY

AMAPARICUT

IN

If you break up the rows differently, you can get this:

PINATUBO

RAINIER

FUJIYAMA

PARICUTIN

These are the names of volcanoes. It’s possible students will recall what I’ve said about those volcanoes in class, and immediately realize that the first three are stratovolcanoes, while the last is a cinder cone. On the other hand, the solution might involve looking up each volcano, listing the important characteristics, noticing that Parícutin is a cinder cone while the others are not, and verifying that stratovolcano versus cinder cone is an important distinction. The latter scenario requires a lot of work and ends in a very clear idea about the difference between a stratovolcano and a cinder cone.

Anything that can be googled will be googled

When designing these quests there were a few things I wanted to accomplish. One was that students from a variety of backgrounds and with a variety of interests would be a valuable part of the solution. In fact, I wanted them to realize something very specific: that their background and perspective, whether they considered themselves “science people” or not, was indeed valuable for figuring out a puzzle about science.

To make Mission (Geo)Impossible a meaningful exercise, it was important that students could not simply look up the answer somewhere. As far as possible, I tried to make the clues things that could not be put into a search engine, or something that could be searched, but would only give another clue to the problem. At first blush, this might sound next to impossible, but here’s an example of something unsearchable:

branches

Detail of a painting at St. Peter’s College

This is a blurry photograph of a corner of a painting. It’s a painting that students walk by daily. The photo is of tree branches, but they aren’t necessarily recognizable as such. There is simply nothing about this that gives you a searchable string. Students would have to recognize the painting, and proceed from there. In this case the deliverable was the age of bedrock beneath the College. Students had to realize that the painting was giving them a location, and then look at a geologic map.

Here are a few other things I kept in mind:

No extraneous information

I didn’t include things that weren’t relevant to the quest. At least not on purpose. The quests were hard enough, and there wasn’t anything to be accomplished by sending students on a false path. They did that on their own often enough.

No process of elimination

I wouldn’t give them a quest in the style of multiple choice because they could simply keep guessing until they got the right answer. Where quests had a finite number of options, there was either work involved to get those options (like the dancing men quest), or work involved in explaining a choice (ditto the dancing men).

Don’t restrict the quests to things explicitly addressed in class.

There is value in extrapolating knowledge and building on it. For example, in the case of Smokey and the Bandit, the plunging folds are easy enough to pick out with some searching, if you know what you’re looking for. However, the plunging folds I show in class are of the “textbook” variety. The ones between Atlanta and Texarkana are much more complex, but still discoverable if students think carefully about how plunging folds are expressed at Earth’s surface. In the end, they found the folds.

Use a wide variety of clues and puzzle types

As best I could, I used clues that involved a wide range of topics (literature, art, science, popular culture of the 1970s). I used puzzles that would appeal to different ways of thinking. Some involved interpreting images to get a word or phrase. For example, a pile of soil next to an apple core would be interpreted as “earth” and “core.” Some were ciphers, and some involved recognizing objects. Some were narratives, like the one below. Students used the stories to get the differences in timing between P-wave and S-wave arrivals, then used triangulation to find the location of an earthquake. But they had to find a map of Middle Earth first, and do some km to miles conversions.

earthquake

It was an earthquake in Fangorn Forest.


So how did this go over with the victims students?

My class was never more than 23 students, and the uptake was 2-3 active teams each time. I would need surveillance throughout the College to see exactly how they responded to the quests (and I’m not sure I’d like what I’d hear). But from conversations with students it seemed there was the right amount of frustration to make solving the quests feel like an accomplishment. In all but one case, teams that started Mission (Geo)Impossible also finished it, or else ran out of time trying.


They submitted solutions at 5:30 in the morning, 11:00 in the evening, and sometimes during the lecture. They brought their quests to the lecture in case I dropped a hint. They came to visit me and said things like, “This is driving me crazy,” and “Why, Karla? Why?” I successfully (I think) suppressed a diabolical grin on most occasions. In fact, they put so much work into this that I felt bad about it from time to time. But it was an optional activity, I rationalized.

Wiggle room

When I started this I had no idea whatsoever whether students would be successful, but I did intend to supply a safety net if it was needed, and make sure their work was rewarded. This is my policy with everything I try in my courses.

In the first iteration things bogged down part way through the term, so to get students going again, I gave them an option: they could request one additional clue to a quest of their choice, or they could request clues for three quests, but I would pick which ones, and I wouldn’t tell them which I chose. (Heh heh.)

Naturally, the teams negotiated an arrangement whereby they sorted out which combination of options would work out to their collective advantage, and then they shared the information. At that point I was very glad I insisted on teams rather than letting individuals play, because as individuals they could conceivably ask for enough clues to specific quests to beat the system.


In the second iteration, I tried a new style of puzzles that turned out to be more difficult than I intended. By the end of the term, and after a massive effort, the teams were only about half way through. In that case I awarded the team with the most quests the 5% and 2.5% to the other team.


The third iteration

I will do this again, but with fewer puzzles (13- still a prime number), and with fewer difficult quests than last time. I will also give students some examples of quests from previous iterations. I’m hoping that will convince more students to get involved.

I won’t relax the rule about participating in teams. I tried that the second time around, and the individual participants either did not get started, or got hopelessly off on the wrong track. I do need to find a solution for students who want to participate, but aren’t comfortable approaching other students in the class who they don’t know.

But I will find a way to get as many students involved as possible, because the potential for this activity to give students confidence in their ability to approach difficult tasks- even seemingly impossible ones- is just too important.

Oh yes, and by the way…

I dare you.

dare

Deliverable: x + y + z

Clear As Fine-Grained Sediment Mixed With Water: A Discussion Forum

This week I’m presenting a poster at the Earth Educators’ Rendezvous. The poster is about a discussion forum activity that I do with my introductory physical geology students at St. Peter’s College. I’ve turned my poster into a blog post just in case anyone is thinking about trying a similar activity and would like to refer back to it. Alternatively, folks may simply want to confirm that some nut at an academic meeting designed a poster consisting largely of cartoons. Either way, here it is.Intro

Why

How

You can download a copy of the handout for this activity, including the rubric, here.

Examples.png

Strategies

This is a great resource from the University of Wisconsin-Stout for explaining online etiquette to students.

summary